Getting Started
Installing Software
Mac
Install the repository using pip.
pip install nuro-arm
Windows
We recommend installing pybullet with conda first, then install the repository with pip.
conda install -c conda-forge pybullet

pip install nuro-arm
Now, you have to download the HID library (needed for communicating with robot over USB):
Download zip file
In File Explorer, navigate to [downloads directory]\hidapi-win\x64
Copy the files: “hidapi.dll”, “hidapi.lib”, “hidapi.pdb”
Paste them in C:\Users\[username]\Anaconda3\envs\[your-env-name]
Linux
First, install the repository using pip.
pip install nuro-arm
Then, install the following libraries which are needed to communicate with the robot over the USB connection.
sudo apt-get install libhidapi-hidraw0 libhidapi-libusb0
If you experience problems connecting to the robot, you may need to run the following command (usually everytime you restart the machine).
sudo service fwupd stop
Parts List
The full robot kit costs around $250. The robot and camera can be ordered easily on Amazon. Currently, the camera is mounted to the robot base using custom 3D printed parts (STL files). We are working on sourcing a camera mount that does not require 3D printing.
Description |
Price |
|---|---|
$200 |
|
$32 |
|
$20 |
|
Camera Stand |
$10 |
Assembly Instructions
The assembly process takes about 2.5 hours and does not require any additional tools. The parts will all be located in the Hiwonder box. To assemble the robot, watch the following instructional videos provided by Hiwonder.
Assembly 02: self-tapping means the screws will have a pointy end.
Assembly 03: it may take some force to fit the blue parts over the servo horns; the portion after 3:25 is about cable management and is optional. If any wires are sticking out too much, you might want to fasten them down to avoid them getting caught during motion.
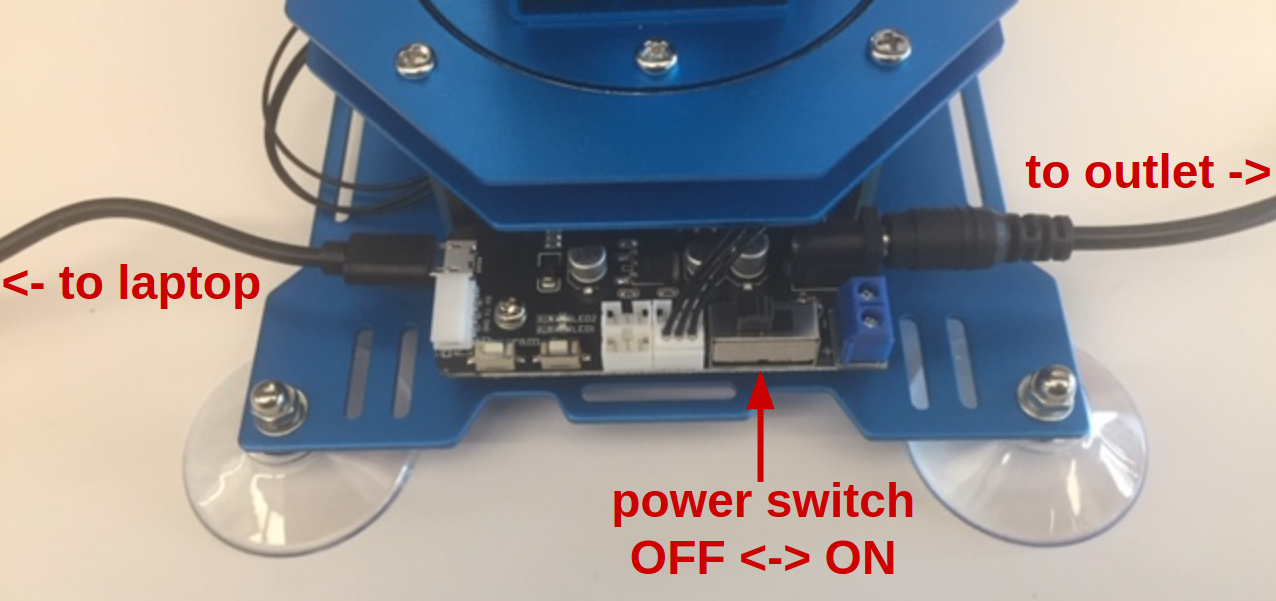
The final step is to plug in the robot. We must plug two things into the controller board on the robot: the power supply and the usb cable. See the pictures below to understand how to plug things in. If everything is correct, when you flip the power switch to ON, lights on the motors will turn on. If you hear a beeping noise, this means the power supply is not plugged in. Do not leave the robot on for extended periods of time, so make sure to flip the power switch when done.
Calibration
The robot needs to be calibrated after assembly. Initiate the calibration process with the following command, and you will be guided through the process with several popup windows.
calibrate_xarm