Using Robot Arm
Connecting to Robot
Before connecting to the robot, turn it ON using the switch on the control board. If it makes a beeping noise, then you need to plug in the power cable. Do not run the commands on this page unless you have already calibrated the robot.
To interface with the robot, use the RobotArm class. You can choose between
using the real xArm robot (controller_type='real') or a simulator version of
the robot (controller_type='sim') if you do not have the robot. This is shown
in the following Python code snippet. Notice the last two commands, which show
how to change from active mode to passive mode. The robot defaults to
active mode (all motors are on and will resist movement). If you plan to move
the robot by hand (for instance to demonstrate movements), then you must enter
passive mode. The robot will automatically disconnect when the script ends.
from nuro_arm import RobotArm

# connect to robot
controller_type = 'real' # or 'sim'
robot = RobotArm(controller_type)

# turn off motors, useful for guiding robot by hand
robot.passive_mode()

# turn on motors
robot.active_mode()
Joint Angle Control
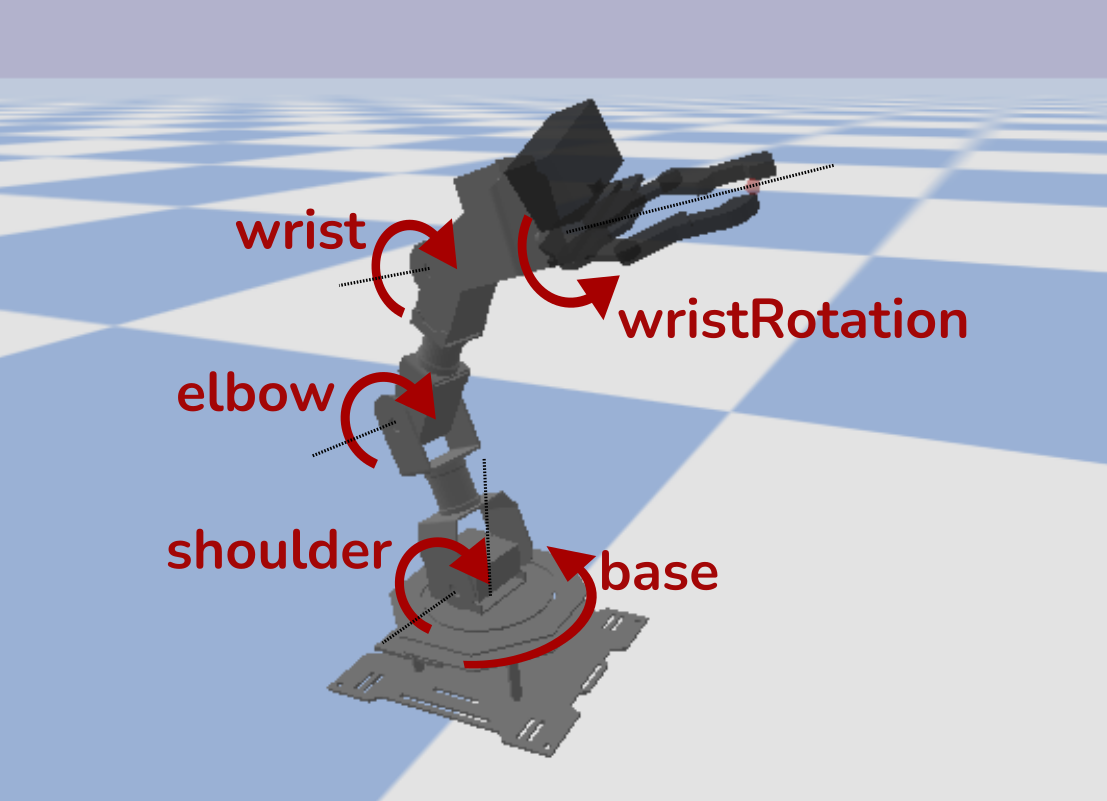
The simplest way to control the robot is to set the angle for each of the five joints in the arm. The names and directions of each joint are shown in the image below. For instance, by increasing the angle of the elbow joint, then the robot’s gripper is moved closer to the ground. If all joint angles are set to 0, then the robot is in the HOME position (this is what you set during calibration). The robot expects joint angles in radians.
If you want to gain more intuition about the joints of the robot, try running
the script: $ move_arm_with_gui (use argument --sim if you don’t have real robot),
which allows you to move each joint with a slider.
Here is a brief example of how to set and read the joint angles of the robot
using RobotArm.move_arm_jpos and RobotArm.get_arm_jpos. The API refers to
joint angles as joint positions (or jpos).
# joint angles in radians, from base to wrist_rotation
jpos = [0.3, 0, 0, 0, 0]

# sends command, returns once motion stops
robot.move_arm_jpos(jpos)

# see achieved joint angles
achieved_jpos = robot.get_arm_jpos()
End Effector Control
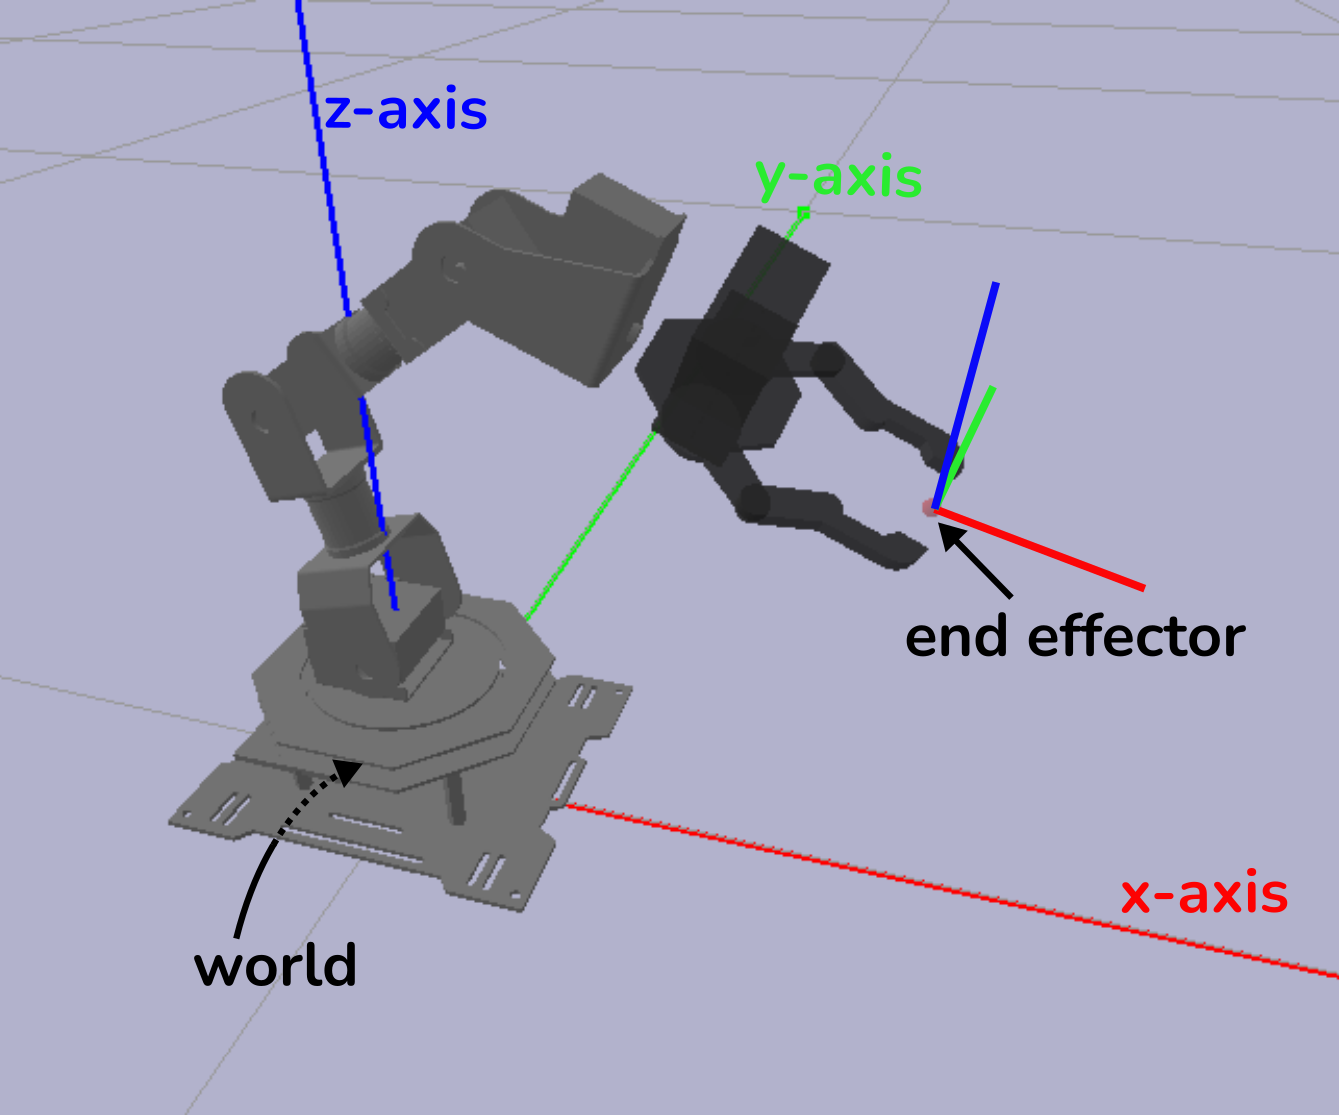
For certain tasks, like picking up an object, it is useful to command the robot to move its gripper to a specific location in the world. This is called end effector control. The figure below illustrates the end effector of the robot and how the position is defined. For this robot, the end effector is located at the point where the gripper fingers close (thus if an object is located at X, then moving end effector to X allows grasping the object). The position of the end effector is defined in meters, relative to the world (e.g. the ground underneath the center of the robot). For reference, the end effector position pictured here is about <x=0.15, y=0., z=0.08>.
Once the robot receives the desired end effector position, it performs a calculation, called Inverse Kinematics, to determine the joint angles that each motor should be set to. Below, we have a simple example showing how to move the end effector to a position and read the current end effector position.
# end effector position, units in meters
ee_pos = [0.2, 0.0, 0.1]

# sends command, returns once motion stops
robot.move_hand_to(ee_pos)

# see achieved end effector position
achieved_ee_pos, _ = robot.get_hand_pose()
Using Gripper
The gripper is controlled independently from the arm. Most of the time, it is sufficient to either fully open or fully close the gripper. However, you can also specify how open/closed you want the gripper to be. Examples of each of these commands are shown here:
# opens gripper, returns once motion stops
robot.open_gripper()

# closes_gripper, returns once motion stops
robot.close_gripper()

# for more fine-grained gripper control, use float ranging from
# 0 (fully closed) to 1 (fully opened)
robot.set_gripper_state(0.1)

# get current gripper state (ranging from 0 to 1)
gripper_state = robot.get_gripper_state()
Usually, it is not advised to command a movement if you know it will cause a
collision. So, do you have to anticipate an objects size when commanding how
far to close the gripper when grasping? No, instead you can use
the argument backoff in Robot.set_gripper_state. Backoff determines what
will happen when the gripper tries to move but encounters and object. If backoff
is negative, then the gripper will apply some clamping pressure to the grasped
object, without damaging the motors. By default, RobotArm.close_gripper
sets backoff=-0.05. It is unlikely you will need to change this argument.
Advanced Motions
By default, the motions produced by RobotArm.move_arm_jpos and Robot.move_hand_to
are linear in joint space. The speed can be controlled using the speed argument,
which specifies the movement speed in radians per second. For safety reasons, the
robot will restrict speed to be in the range of 0.1 to 4.0. Here is an
example showing two ways to adjust the movement speed:
# by default the speed of all motors is 1.0
robot.move_arm_jpos(jpos)

# increase speed for ALL arm joints
robot.move_arm_jpos(jpos, speed=2.0)

# restrict speed of base joint, keep others at default speed
robot.move_arm_jpos(jpos, speed=[0.5, 1, 1, 1, 1])
The speed argument is also available for Robot.set_gripper_state.
So far, all of the movement commands have been safe. Under the hood, the
RobotArm class monitors all movements to detect and stop unanticipated collisions,
so even if you tried to break something (please don’t), you would have a hard time.
For most applications, you should stick to these commands. However, for applications
where you need complex or fast motions (for instance drawing or throwing) it is
better to avoid the monitoring, which requires full stops between movements.
To run a motion without the monitoring, you can send commands directly to the servos
using RobotArm.controller.move_servos(joint_ids: List, jpos: List, duration: int).
The interface is a bit more complicated so we will show some examples uses below
(see this script
demonstrating how to perform cartesian control).
# get ordered list of joints => (base, shoulder, elbow, wrist, wristRotation, gripper)
joint_names = robot.joint_names

# move base and elbow to joint positions of 0 radians over 2000 milliseconds
robot.controller.move_servos([0, 2], [0., 0.], duration=2000)

# to get 'smooth' movements, send new command as old one is about to finish
# here we move wristRotation by increments of 0.15 radians
import time
duration_ms = 100
for i in range(10):
    robot.controller.move_servos([4], [0.15*i], duration=duration_ms)
    # sleep expects a time in seconds so divide by 1000
    time.sleep( (0.95 * duration_ms) / 1000 )

# to get multiple motors to move at different speeds, you can simply run
# commands one after the other
# here we move elbow twice the speed of wrist (e.g. half the duration)
robot.controller.move_servos([2], [0], duration=500)
robot.controller.move_servos([3], [0], duration=1000)
Since there is no collision detection, we recommend that you plan out motions using
the simulated robot. If an unsafe motion does occur, either terminate the script
or turn off the robot. There are no safeguards on the speed of movement so start
with a large value of duration (it is in milliseconds), and then reduce as needed.
Collision Detection
Coming soon…
Care and Maintenance
Always clear the area around the robot of any fragile objects before using it.
Always turn off the robot when not in use.
Do not run the robot for extended periods of time; if you want to stay connected while you debug, then place the robot in passive mode to prevent the motors from overheating.
Check that there is no pinching or straining of the wires between motors. This is especially important if you are performing fast motions.
Do not move the motors by force. If there is resistance to movement, the motors may be ON. Either turn off the robot or place it in passive mode.